

8 What Equipment Do You Need to Make Online Video Courses? A Complete Guide to Recording Teaching Videos for Beginners
From phone filming, microphone audio pickup, lighting setup to screen recording and video editing, help education centres, training institutions and independent instructors produce clear and practical teaching videos on a reasonable budget.
Do you really need a professional camera to make online video courses? In fact, you can start recording teaching videos with a phone, a microphone, simple lighting and basic editing tools. This article introduces beginner course production equipment, screen recording software, audio recording tips, filming environments, video formats and budget planning, helping education centres, trainers and content creators in Malaysia produce courses suited to online learning, and introduce their teaching services through the WeiCity merchant channel.
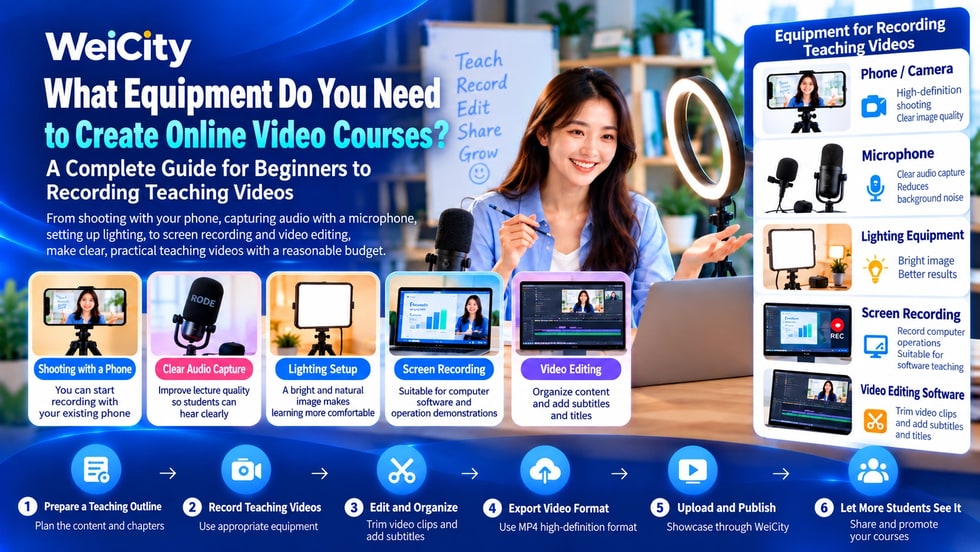
As online learning becomes increasingly common, many education centres, tuition teachers, trainers and content creators are starting to consider making their own teaching videos.
But when it comes to recording courses, many people think of professional studios, expensive cameras and complicated video editing equipment.
In fact, to start making online video courses, you do not necessarily need to invest a large amount of money.
📱 If you already have a phone, can you start recording?
🎤 How should you choose a microphone?
💡 Without a photography light, can you use natural light?
💻 Do you need a camera to teach Excel or computer software?
🎬 After the video is finished, what format should you use?
💰 How much budget do you need to prepare for a basic video course in Malaysia?
For merchants who are just starting to run online courses, the most important thing is not how expensive the equipment is, but that learners can see clearly, hear clearly and understand the teaching content.
The following introduces beginner-friendly methods for making teaching videos.
Not necessarily.
Many smartphones today are already capable of recording high-definition video.
If the course content mainly consists of teacher explanations, basic operation demonstrations or simple teaching activities, you can first test the filming results with your existing phone.
For example:
📚 A tuition teacher recording maths problem explanations.
🗣️ An English teacher demonstrating pronunciation and everyday conversation.
🎨 A painting teacher showing painting techniques.
🍰 A baking instructor recording cake-making steps.
👨🏫 A trainer introducing basic course knowledge.
When filming with a phone, it is recommended to note the following.
✅ Clean the phone lens to avoid a blurry picture.
✅ Use a stable stand to reduce shaking.
✅ Keep an appropriate shooting distance.
✅ Choose a location with sufficient light.
✅ Minimise clutter in the background.
✅ Check storage capacity and battery level in advance.
For general teaching videos, you can first try recording in 1080p HD quality.
If you need to show small text, fine operations or special teaching content, adjust the recording specifications according to actual needs.
Teaching videos differ from general entertainment short videos.
Learners need to keep hearing the teacher's explanations clearly.
Even if the picture is clear, if the sound is too quiet, has too much noise or is often hard to hear, the learning experience will be affected.
Therefore, for courses that are mainly explanation-based, improving sound capture is usually worth prioritising.
Common types of microphones include:
🎙️ Lavalier Microphone (clip-on microphone)
Suitable for instructors who stand and explain, move around for demonstrations, or teach facing the camera.
🎤 USB Microphone
Suitable for recording courses at a computer, explaining software or producing voiceovers.
🎧 Headset Microphone
Suitable for recording computer lessons, online demonstrations and simple commentary in the early stages.
🎬 Directional Microphone
Suitable for recording scenarios that require more flexible sound-capture arrangements.
When choosing a microphone, do not look only at the price.
You should also confirm:
✅ Whether it is compatible with your phone or computer.
✅ Whether its pickup distance meets your needs.
✅ Whether it is easily affected by ambient noise.
✅ Whether additional connecting devices are required.
✅ Whether the battery or power supply method is convenient.
Before recording, it is recommended to shoot a test video of 30 seconds to 1 minute to confirm the sound is clear before starting the formal lesson.
Yes.
If the filming environment has sufficient and stable natural light, you may not need to buy a professional photography light at the beginning.
For example, record teaching videos near a window.
However, avoid strong sunlight shining directly on the face, which can cause obvious shadows or uneven exposure.
Recommendations:
☀️ Choose a position that is bright but not glaring.
🪟 Try to direct the main light toward the front or front-side of the teacher.
💡 Avoid filming the teacher with a bright window behind them.
📱 Check whether the phone screen looks too dark or too bright.
🎬 Make sure the brightness stays relatively stable throughout the entire recording.
If you need to record in the evening, or the room has insufficient light, consider using LED lights or soft light panels.
For small teaching spaces, simple and stable lighting arrangements can often already improve the picture quality.
Holding a phone by hand to record a long teaching video can easily cause the picture to shake.
Moreover, instructors may also need to write, operate equipment, or show teaching materials at the same time.
Therefore, a stable holder is a practical basic tool.
Different courses can use different holders.
📱 Phone tripod: suitable for explaining while facing the camera.
📚 Desktop holder: suitable for desk-based teaching and displaying small objects.
🎨 Overhead holder: suitable for drawing, writing, and handicraft demonstrations.
🍳 Multi-angle holder: suitable for baking, cooking, and making demonstrations.
For example, a drawing teacher can use an overhead angle so that students can clearly see the paper and brushes.
A math teacher can use a fixed camera to show the problem-solving process on a whiteboard.
The key is to ensure that students can keep seeing the teaching content clearly.
If the course mainly covers computer operation, a camera is not necessarily required.
For example:
💻 Basic Microsoft Excel teaching.
🎨 Adobe Photoshop image editing.
📊 PowerPoint presentation creation.
🌐 Website back-end operation.
📱 Digital marketing tool applications.
🖥️ Computer system and software usage.
These courses can be produced using screen recording.
The instructor operates the computer while explaining through a microphone.
Common tools include:
🎬 OBS Studio: for screen and video recording.
💻 QuickTime Player: Mac users can use it for basic screen recording.
🪟 Windows built-in screen recording tool: suitable for some basic screen recording scenarios.
✂️ Other video editing software: for trimming, organizing, and adding subtitles.
Software features, free-use scope, and system compatibility may change with versions. Please check the relevant official information before use.
When recording computer courses, also pay attention to the following:
✅ Enlarge important text and operation areas.
✅ Avoid opening too many unrelated windows.
✅ Turn off notifications that may reveal personal information.
✅ Use clear mouse operations and explanations.
✅ Add local zooms or on-screen annotations when necessary.
For computer trainers, clear screen recording may be more important than filming the teacher in person.
After recording is complete, simple editing is usually needed.
For example, removing mistakes, adjusting sound, adding course titles, or organizing chapters.
Beginners can start with tools that are easy to use.
📱 CapCut: suitable for basic video editing and some subtitle work.
💻 iMovie: suitable for basic editing for some Apple device users.
🎞️ DaVinci Resolve: suitable for creators who need more advanced video editing.
🖥️ Other suitable editing software: choose according to computer performance, budget, and teaching needs.
There is no need to learn all advanced editing effects from the start.
For teaching videos, it is recommended to prioritize the following:
✅ Remove unnecessary pauses and mistaken segments.
✅ Adjust volume that is too loud or too soft.
✅ Add a clear course name.
✅ Use an appropriate amount of subtitles or key text.
✅ Make sure the demonstration visuals are clearly visible.
✅ Keep a consistent style across different chapters.
Too many animations, sound effects, or complex transitions do not necessarily help students learn.
The focus of a teaching video should always be on the knowledge content and its effectiveness in aiding understanding.
Even with good equipment, recording may still go poorly without a clear teaching plan.
For example, an English instructor preparing to record a basic pronunciation course.
Without a teaching outline, the following problems may occur:
🔸 Repeating the same knowledge.
🔸 Missing important learning steps.
🔸 Videos that are too long and lack focus.
🔸 Not knowing what to record next.
Therefore, it is recommended to prepare a simple outline before recording.
For example:
📘 Course name: Basic English Pronunciation Teaching.
🎯 Learning objective: Recognize common English vowel sounds.
📝 Part 1: Introduce the course topic.
🗣️ Part 2: Demonstrate different pronunciations.
🎬 Part 3: Show actual words.
📚 Part 4: Provide practice methods.
✅ Part 5: Summarize the key points of this lesson.
This not only helps the instructor record smoothly, but also makes it easier to organize the material into a series later.
When starting to make video courses, you can first use existing offices, classrooms, or home spaces.
Recommended choices:
🏠 A relatively quiet room.
💡 A location with stable lighting.
🪑 Tables and chairs suitable for long periods of teaching.
📚 A tidy background space that is not easily distracting.
🔇 Minimize noise from traffic, air conditioning, and other equipment.
📱 A position where the phone or camera can be held stably.
For example, a tutor can record lessons in front of a whiteboard.
A computer trainer can perform screen recording at a desk.
A baking teacher needs to choose a kitchen space where ingredients and the cooking process can be easily shown.
Different courses should arrange the filming environment according to the actual teaching content.
If you already own a phone or computer that can record HD video, you can start with your existing devices.
The following is a sample budget for basic equipment planning and is not a real-time market quote.
📱 Option A: Start with existing equipment
Existing phone or computer: RM0 additional device cost.
Simple phone holder: budget RM20 to RM80.
Basic microphone: budget RM30 to RM150.
Using existing light sources: RM0 additional lighting cost.
Basic free editing tools: there may be no extra software fees.
📦 Estimated new equipment budget: about RM50 to RM230.
🎬 Option B: Improve the recording environment
Existing phone or computer: continue to use.
More stable holder: budget RM80 to RM200.
Better audio recording equipment: budget RM150 to RM400.
Basic LED lighting: budget RM100 to RM300.
Other simple accessories: budget RM50 to RM150.
📦 Estimated new equipment budget: about RM380 to RM1,050.
The above amounts are only sample budget plans. Actual prices vary depending on brand, quality, merchant, and time of purchase.
Costs for computers, phones, paid software, course production time, venue, internet, and long-term storage are also not included.
For merchants who are just starting to try making teaching videos, it is recommended to test with existing equipment first before deciding whether to upgrade.
When making courses, consider that students may watch on phones, tablets, or computers.
Common video production recommendations include:
🎬 Video format: MP4.
🖥️ Video codec: H.264 is a common choice for compatibility.
📺 Aspect ratio: 16:9 suits many horizontal teaching scenarios.
📱 Video resolution: 1920 × 1080 (Full HD) can serve as a starting point for general courses.
🎤 Audio: use clear and stable sound settings.
However, different courses may require different picture specifications.
For example, when demonstrating a phone app, vertical screen recording may be more suitable.
When teaching Excel or PowerPoint, a horizontal frame usually makes it easier to show the complete operation interface.
The final output format should also meet the requirements of the platform where the video will be published or the course will be delivered.
Beyond picture and sound, you also need to consider copyright, student privacy, and file management.
📸 Filming Permission
If the recording includes students, staff, or other individuals, appropriate consent and authorization should be obtained.
👶 Children's Privacy
When filming children's teaching activities, pay special attention to parental or guardian consent and personal data protection.
🎵 Music Copyright
Do not use background music without proper authorization.
📚 Teaching Material Copyright
When using images, books, teaching materials, or other people's video content, confirm the usage rights.
📂 Original File Backup
It is recommended to properly keep original recorded videos, audio, and editing files.
🔒 Data Security
Avoid accidentally recording students' names, phone numbers, or other personal data into public courses.
Merchants should handle related matters in accordance with applicable laws and their actual business circumstances.
Once the teaching videos are completed, the next step is to let the people who need them learn about the courses.
Education centers, training institutions and individual instructors can use the WeiCity merchant channel to introduce their teaching services in one place.
🏪 Introduce the Teaching Institution
Explain the background of the education center, training institution or individual instructor.
📚 Organize course materials
List course names, teaching topics, target learners and learning objectives.
🎬 Introduce the Teaching Videos
Share course-related introductions and teaching updates in line with the content publishing methods actually supported by the platform.
👨🏫 Showcase Teaching Strengths
Explain the teaching format, instructor experience and areas of expertise.
📱 Provide a Course Inquiry Entry Point
Let prospective students know how to contact the merchant, learn about fees and sign up.
🔗 Share your channel link in one place
Share course materials through social media and everyday promotion channels.
For example, an Excel trainer could introduce:
💻 Excel basic operations course.
📊 Excel common formulas course.
📈 Excel data organization course.
📝 Excel practical application exercises.
Explain the learning objectives, content and target learners of each course separately.
Note that presenting course materials is different from video hosting, autoplay, paid viewing and learning progress management.
If you want to provide a complete online course delivery service through WeiCity, first confirm the features, file specifications and conditions of use that the platform actually supports.
To help more prospective students find your teaching content, in addition to making videos, prepare clear course names and descriptions.
For example:
❌ Video title: Teaching Lesson 1.
✅ Suggested title: Excel Basic Teaching | How Can Beginners Use the SUM Function?
❌ Video title: English Learning.
✅ Suggested title: English Speaking Pronunciation Basics | Common Pronunciation Practice for Beginners.
❌ Video title: Cake Making.
✅ Suggested title: Beginner Baking Course | Simple Sponge Cake Making Lesson.
Course introductions should include:
🔍 A clear teaching topic.
📚 The main content of this lesson.
🎯 Suitable learners.
👨🏫 Information about the instructor and institution.
🗣️ Language of instruction.
🎬 Teaching format.
📞 How to inquire and sign up.
If the page is public and search engines are allowed to crawl it, these clear text details can help Google understand the page content.
However, whether it can be indexed and rank depends on website technical settings, content quality and search competition, among other factors.
If you are an instructor just starting to create online courses, you can follow the steps below.
✅ Step 1: Choose a simple and clear teaching topic.
✅ Step 2: Decide which learners the course is suitable for.
✅ Step 3: Prepare a simple teaching outline.
✅ Step 4: Test recording with a phone or computer you already have.
✅ Step 5: Check the sound, lighting and camera angle.
✅ Step 6: Record a short teaching video first.
✅ Step 7: Delete incorrect segments and adjust the volume.
✅ Step 8: Check that the text and operation screens are clear.
✅ Step 9: Ask a suitable person to preview the clip and collect feedback.
✅ Step 10: Adjust based on feedback and produce subsequent lessons.
After completing the first video, you can gradually build a recording process that suits you.
This not only helps improve teaching quality, but also avoids spending too much on equipment at the start.
Making online video courses does not necessarily require a professional studio or expensive camera equipment.
For many teachers and merchants who are just starting online teaching, an existing phone, a simple microphone, a stable stand and basic editing tools can be enough to begin creating courses.
What should be prioritized is:
🎯 Whether the teaching objectives are clear.
🎤 Whether the explanations are easy to hear.
🎬 Whether the teaching visuals are clear.
📚 Whether the content is arranged sensibly.
👨🎓 Whether learners can understand it.
📱 Whether the course materials are easy for prospective students to understand.
As the course content matures, merchants can upgrade recording equipment and production methods based on actual needs.
🌐 WeiCity | Let your expertise be seen, and make it easier for learners who need it to understand your courses.
🎓 Start with the equipment you have, and gradually turn your teaching experience into valuable online learning content.